Friday, December 20, 2013

Specialty Sandwiches

These sandwiches are so so good. The secret behind them is the amazing vinaigrette dressing. Enjoy!


McCormick's Vinaigrette Mix

Ingredients:
1 teaspoon Italian Seasoning
1 teaspoon sugar
½ teaspoon onion powder
¼ teaspoon basil leaves
¼ teaspoon dill weed
1 ½ teaspoon garlic powder
1 ½ teaspoon seasoned pepper blend
¼ cup olive oil
¼ cup white vinegar
1 ½ teaspoon salt

Directions:
Blend ingredients together.

Specialty Sandwiches

Ingredients:
Hoagie rolls
Pastrami
Salami
Swiss Cheese
Lettuce
Tomatoes
McCormick's Vinaigrette Mix

Directions:
Preheat oven to 375 degrees.
Split hoagie rolls in half.
Layer pastrami, salami and swiss cheese.
Put in preheated oven for 3-5 minutes, until cheese is melted.
Take out of the oven and finish assembling with lettuce, tomatoes and vinaigrette.


Tuesday, December 10, 2013

Blueberry Zucchini Bread

Blueberry Zucchini Bread

Ingredients:
3 eggs, lightly beaten
1 c. vegetable oil
3 t. vanilla
2 c. white sugar
¼ c. brown sugar
2 c. shredded zucchini
3 c. flour
1 t. salt
1 t. baking powder
¼ t. baking soda
1 T. cinnamon
⅛ t. nutmeg
1 pint blueberries

Beat eggs, oil, vanilla and sugars.  Beat in flour spices.  Fold in zucchini and berries.  Pour into greased loaf pans.  Bake at 350 degrees for *1 hour for 2 large loaves - 50 minutes for 4 small loaves. Top with crumbly streusel topping for extra deliciousness.

Crumbly streusel topping:
⅔ c. flour
½ c. brown sugar
½ c. white sugar
1 t. cinnamon
½ c. chopped nuts
1 cube butter

*Note: I have now made this at extreme elevation changes and I'm here to tell you that effects the amount of time required to bake this bread. So it goes for at least an hour, but make sure to check with a toothpick just in case it needs to go longer! Like... WAY longer. Like 30 minutes longer or more. Trust me it was driving me a little crazy. Make sure to keep checking it.

Tuesday, November 26, 2013

Easy Bread Maker Rolls

These rolls are seriously SOOO good. We like to make them with half wheat flour and half white flour and they turn out so light and fluffy with such good flavor. If you prefer a white roll, these also make exceptional white rolls.

I also LOVE that the work is done with a bread maker!


Bread Maker Dinner Rolls
Ingredients:
1 cup water
2 tablespoons butter, softened
1 egg
3 1/4 cups AP flour (OR  you can do what I did and add 1 1/2 cups wheat flour and 1 3/4 cups AP flour instead)
1/4 cup sugar
1 teaspoon salt
3 teaspoons regular active dry yeast 
                       OR
3 teaspoons bread machine yeast or quick-acting active dry yeast

Directions:
1. Place all ingredients in bread pan in the order listed. Set your machine to the Dough Cycle and press START.
2. Heat oven to 375°. Line cookie sheet with parchment paper. Divide dough into 15 pieces. Shape each piece into a ball. Place 2 inches apart on cookie sheet. Brush with butter. Cover; let rise for 30 to 40 minutes or until doubled in size.
3. Once risen, bake 12 to 15 minutes or until golden brown. Brush tops with butter if desired. 

Sunday, November 10, 2013

Yummy Steak Fajitas

These fajitas are seriously so good, and SOO ridiculously easy. They don't have to be made with steak either, they can be thrown together with whatever meat you have in the house, but the steak happens to be my personal favorite.


Steak Fajitas

1 green bell peppers, sliced
1 red bell pepper, sliced
1 onion, sliced
1 cup fresh mushrooms, sliced
2 cups diced cooked steak (or any other type of meat that you have on hand!)
1 .7 oz package dry italian dressing mix
tomatoes, chopped
shredded cheese
tortillas
sour cream

Instructions:
Sauté peppers and onions in small amount of oil until tender. Add mushrooms and meat. Cook on low heat until heated through. Add dressing mix and stir it all together. Serve with chopped tomatoes, cheese, sour cream and warm tortillas. 

Side note:
One of my favorite things about these fajitas is that they make even better leftovers! This recipe is perfect for my small family of two to have leftovers for a few days. 

Saturday, November 9, 2013

Honey-Orange Pork Tenderloin

My friend Kara introduced me to pork tenderloin, and I am so glad she did!  If you have never cooked pork tenderloin, it is DELICIOUS!  And inexpensive.  And healthy!  I needed some fancy enough to serve to guests one Sunday, as well as something that didn't cost a lot, and she suggested pork tenderloin.  We have had it twice now, and it is so tender and flavorful it has become on of our favorite things to make.

Our Best Bites has several excellent recipes for pork tenderloin. Kara really loves the garlic-rosemary recipe they have. We tried the Honey-Orange, and it is awesome.  Click here to find the full recipe, complete with pictures and instructions.

Honey-Orange Pork Tenderloin
Recipe lightly adapted from Cooking Light
Ingredients:
1/3 cup orange marmalade
3 tablespoons cider vinegar
3 tablespoons soy sauce
1 1/2 tablespoons minced garlic
1 1/2 teaspoons honey
2 tablespoons vegetable or olive oil
1 1-pound(ish) pork tenderloin
Kosher salt and black pepper

Instructions:
Preheat oven to 400 degrees. In a small mixing bowl, whisk together the marmalade, vinegar, soy sauce, garlic, and honey. Reserve 2 tablespoons and set the sauce aside.
Heat the oil in an oven-safe skillet over medium-high heat. Season the pork tenderloin with salt and pepper. When the oil is hot, add the tenderloin and cook for 1-2 minutes or until a golden brown crust starts to form. Flip the tenderloin over and cook for another 1-2 minutes or until the entire tenderloin is golden brown. Remove from heat. Pour about 1/2 of the sauce over the pork. Place the pan in the oven and cook for 10 minutes. Remove the pan from the oven and flip the tenderloin over. Add the remaining sauce (not the reserved 2 tablespoons) and place the pan back into the oven. Cook for another 10 minutes or until a thermometer reads 155 degrees. Remove from oven and allow to stand for 10 minutes. Drizzle with reserved sauce and cut into 1/2″ slices. Serve immediately with a salad or vegetables. 1 1-pound tenderloin serves 4.

Saturday, October 5, 2013

Creamy Tomato Tortellini Soup

We had this for dinner last night.  DELICIOUS!  I love when yummy meals are this easy.
Creamy Tomato Tortellini Soup
  • 2 whole large Cloves Of Garlic Minced
  • 2 Tbl Olive Oil
  • 2 10 3/4 oz Cans of Condensed Tomato Soup
  • 1/4 cup Sun Dried Tomatoes, chopped or 2 Tbl Of Sun Dried Tomato Paste
  • 2 cups Half-and-half
  • 2 cups Chicken Stock or Vegetable Stock
  • 1 tsp Onion Powder
  • 1 Tbl Italian Seasoning
  • 1/2 tsp Salt
  • 1/2 tsp Pepper
  • 1 whole 9 Oz Package Of Cheese Filled Tortellini
  • 1/2 cup Shredded Parmesan Cheese, for garnish
Saute garlic with the olive oil in a large stock pot over medium heat until golden brown.
Be sure to keep an eye on it so it doesn’t get too brown or burnt.

When the garlic is done, add tomato soup, tomatoes, half and half, chicken stock and spices.
Bring to a simmer.

Once simmering, drop tortellini into the soup. Cook according to the package directions.
After tortellini are cooked, ladle soup into bowls and top with Parmesan cheese.

Monday, September 23, 2013

My new favorite chocolate cake

This isn't much different from the chocolate cake recipe I used before, but I do like it even better and so it's my new go-to chocolate cake recipe.  I made it as a bundt cake for a dinner party with friends and also as a round layered birthday cake for Darla, and both times it turned out fabulous.  It's a very versatile, moist, yummy recipe!


Ingredients
  • Chocolate Cake Mix (I prefer devil food cake, but any cake mix will do) 
  • Chocolate Instant Pudding, 3.9 oz size 
  • 4 eggs 
  • 1 cup sour cream 
  • ¾ cup water 
  • ¾ cup oil 
  • 1/2 bag chocolate chips (I prefer mini chips) 
Instructions

Preheat oven to 350 degrees. Mix all ingredients well and pour batter into a well-greased and floured pan. Bake on middle rack for 40-50 minutes. Remove from oven when a toothpick comes out clean.

IF MAKING A BUNDT CAKE: Let cake cool completely in pan. Take a small slender spatula and loosen cake around the outside & inside edges. Tip upside down onto platter.  Whip up the icing for the top of the bundt while it's cooling:

Bundt Chocolate Icing
  • 2 tablespoons cocoa powder
  • 1 cup powdered sugar
  • ¼ teaspoon vanilla
  • 1-2 tablespoons milk
  • 2 tablespoons melted butter
Mix together the ingredients. Stir forever, until it’s smooth and thick. If it’s not runny enough, add a bit of warm water or more melted butter until it’s at the consistency you like.  You want it runny, because when the cake is cool you just drizzle this all over the top for some more chocolate deliciousness. 

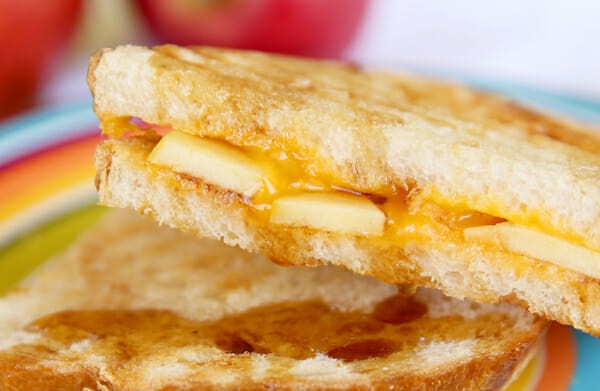
Maple Drizzled Apple-Cinnamon Grilled Cheese Sandwiches

Oh, these sandwiches are heaven.  I found these on the OurBestBites website this afternoon while trying to think of what to make for dinner.  We made them tonight for a quick and easy dinner, and the blend of different flavors was amazing.  I love when food is easy AND delicious!!


Grilled Cheese with Apples close up
Photo from OurBestBites.com

Measurements are approximate. These are sandwiches- don’t overthink it!

Ingredients
  • 4 slices rustic sandwich bread 
  • 8 slices sharp cheddar cheese (or enough to cover all the slices) 
  • 1-2 sweet, crisp apples 
  • ground cinnamon 
  • kosher or sea salt 
  • 3-4 tablespoons real butter 
  • 100% real maple syrup 
Instructions

Butter each slice of bread and place slices butter-side down on a cutting board. Place cheese on each slice of bread. Core apples and slice into 1/8 inch slices. Place apple slices on 4 slices of bread and lightly sprinkle them with ground cinnamon and salt. Put sandwich halves together and grill in a hot skillet, or on a Panini grill, or broiled in the oven, flipping sandwiches and cooking until each side is golden brown and cheese is melted. Drizzle with maple syrup, or serve on the side for dipping. Makes 4 sandwiches.

This would also be delicious for breakfast, lunch, snacktime, whatever!   :)  

Tuesday, August 27, 2013

Sauteed Mushrooms


I've always liked mushrooms, but lately I might be a tiny bit OBSESSED.  Mmmmmmmmmmm, they are just soooooo yummy!  Unfortunately, I am the only one in my family who feels this way, so I've been trying out some easy ways to prepare mushrooms for just myself. This is my favorite way right now.  I whip these up for myself for lunch all the time.  Eat them with a little fruit and bread on the side - awesome!  They would also be excellent on a burger, porkchops, or just as a side dish when you have company.  Oh, mushrooms, I am in love!

  • 1 lb. mushrooms, sliced
  • butter
  • dry Italian salad dressing mix (I've also heard ranch is good...)
Melt the butter in a frying pan over low heat.  Mix in the dry dressing mix and then the mushrooms.  Cook on low, stirring occasionally, for about 30 minutes or until mushrooms are very tender.  Your house will smell like a gourmet restaurant.  Eat them hot for a heavenly experience. 

Tuesday, August 6, 2013

Honey Sauced Chicken

We tried this new crock pot chicken recipe the other night and LOVED it!  This recipe was found on MMM...Cafe's website.  I also used the photo they had posted . . . looks yummy!

This recipe only serves 2, so we always double...or triple! :)


  • 3/4 pound chicken (of your choice) 
  • 1/2 tsp. salt 
  • 1/4 tsp. black pepper 
  • 1/2 cup honey 
  • 1/4 cup soy sauce 
  • 1/8 cup chopped onion (or 1/16 cup onion flakes) 
  • 1/8 cup ketchup 
  • 1 Tbs. vegetable oil 
  • 1 clove garlic, minced 
  • 1/4 tsp. red pepper flakes 
Season both sides of chicken with salt and pepper, put into crock pot. In a small bowl, combine honey, soy sauce, onion, ketchup, oil, garlic and pepper flakes. Pour over chicken. Cook on low for 3 hours or on high 1 1/2 hours. Chicken into bite size pieces, then return to pot and toss with sauce. Serve over rice or noodles. To bake chicken as a 30 minute meal: Dice chicken and season both sides with salt and pepper, place in 8x8 pan. Pour sauce over chicken and bake at 350 for 20 minutes, stirring after 10 minutes. Serves 2.

Monday, July 29, 2013

The BEST Chicken Enchiladas I've Ever Made

This is another recipe I found on pinterest.  I pinned it months ago and finally got around to trying it.  Pinterest claimed they were the best chicken enchiladas ever, and I have to say that Gerald and I both agree these are by far the best white chicken enchiladas I have ever made.  They are truly delicious!

They come from Mel's Kitchen Cafe blog.

Creamy Green Chile Chicken Enchiladas
Yield: Serves 4-6

Ingredients

Filling:
  • 3 cups cooked, chopped chicken 
  • 2 (4 oz.) cans of green chiles, lightly drained 
  • 1 package (8 oz.) cream cheese, cubed and softened
  • 1 can white or black beans, rinsed and drained (you can really use any type of bean you prefer here) 
Sauce:
  • 2 tablespoons butter 
  • 1/2 cup chopped onion (about 1/2 medium onion) 
  • 2 tablespoons flour 
  • 1/3 cup chicken broth 
  • ¼ cup milk 
  • ¼ teaspoon salt 
  • ¼ teaspoon pepper 
  • 1 can (7 ounce) green chile enchilada sauce (I love the Stokes brand; I used Stokes Green Chile Sauce with chicken, and I used the whole can even though it was 15 oz, not 7.  It was delicious!)
  •  ½ cup sour cream 
Assembly:
  • 8 ounces (about 2 cups) Monterey jack cheese, shredded 
  • 8 medium (soft taco size) flour tortillas 
  • Handful of chopped fresh cilantro 
Directions

Preheat oven to 375 degrees. In a medium bowl (I used my kitchenaide and recommend a mixer to fully smooth out the cream cheese), combine the softened cream cheese and green chiles. Mix well. Add the chicken and black beans. Mix to combine. Set aside.

In a large nonstick skillet, melt the butter over medium heat. Add the onion and cook, stirring occasionally, until the onion softens and starts to turn translucent, about 3-4 minutes. Sprinkle the flour over the onions and stir well. Cook for 1 minute, stirring. Slowly whisk in the chicken broth and milk. As you whisk and the mixture cooks, the flour will get less lumpy around the onions and the mixture will become smooth. Add the salt and pepper.  Cook over medium heat until the mixture is bubbling and has thickened, about 4-5 minutes.

Remove the skillet from the heat and stir in the enchilada sauce and sour cream. Lightly grease a 9X13-inch baking dish. Spread about 1/4 cup of the sauce on the bottom of the dish. Fill each tortilla with about ½ cup of the chicken/cream cheese filling. Top with a small handful of shredded cheese, a couple tablespoonfuls for each enchilada. Save at least 1/2 cup cheese for the top of the enchiladas. Roll the tortillas up and place seam side down in the prepared baking dish. Continue filling enchiladas until the dish is full (I can easily fit 8 enchiladas in one pan).

Pour the white sauce over the top of the enchiladas. Top with remaining cheese. Bake for 20-30 minutes until the enchiladas are bubbling, hot and lightly browned. Sprinkle fresh cilantro over the top and serve.

FREEZER directions: After assembling, the baking pan can be covered with a double layer of foil and put in a jumbo-sized resealable bag and frozen for up to two months. Bake from frozen by decreasing the baking temperature to 350 degrees F and baking the enchiladas covered for 1 1/2 hours. Uncover and bake an additional 30 minutes to 1 hour until the dish is hot and bubbly.

We served these with Lime Rice and green salad, and it was a wonderful meal!


Sunday, July 28, 2013

Chocolate Chip Cookie PIE

Because pie is awesome, no matter the time of year...
Because this is one of the BEST pies I've ever tried...
Because Sunday afternoons are a great time to bake a new treat...

Let me share with you this delicious recipe!
 
This is a recipe that I've tasted from my friend Tiffany before and she shared with me.  It is an Our best Bites recipe. :)  The photo is from ourbestbites.com

  • 1 unbaked 9-inch pie crust, homemade or store-bought.
  • 2 large eggs
  • 1/2 C flour
  • 1/2 C white granulated sugar
  • 1/2 C packed brown sugar
  • 3/4 C real butter, softened (1 1/2 sticks)
  • 1 C chocolate chips (semi sweet or dark works best, you might find milk too sweet)
  • 1C chopped pecans (optional)
  • Vanilla ice cream, or sweetened whipped cream for serving (A must!)
  • Optional: chocolate sauce 
Preheat oven to 325 F. Beat eggs in a large mixer bowl on high speed until foamy. Beat in flour, granulated sugar and brown sugar. Beat in butter. Stir in morsels and nuts. Spoon into pie shell.

Bake for 55 to 60 minutes or until knife inserted halfway between edge and center comes out clean. Cool on wire rack or serve slightly warmed. Serve with ice cream or whipped cream.

Enjoy!

Saturday, July 27, 2013

Olive Garden Alfredo Sauce


I pinned this recipe for Olive Garden Alfredo Sauce {copy cat} recipe found at Budget Savvy Diva a long time ago, and finally tried it out this week.  It was DE-LIC-IOUS!  Though definitely not low-fat.  But who is thinking low-fat when they are wanting alfredo sauce and pasta anyway, right?  :)  This recipe is easy enough to convince me not to buy the jarred alfredo sauce anymore...
  • 1 pkg Pasta (we like penne, instead of fettuccine) 
  • cooked chicken
  • 1 stick of butter 
  • 1 clove of minced garlic 
  • 1 pint of heavy cream 
  • 1 cup of fresh Parmesan cheese 
  • 2 tbsp cream cheese 
  • 1/4 tsp salt 
  • 1/2 tsp white pepper 
Make pasta to your liking. In a sauce pan over medium heat – melt butter and add garlic and cook for two minutes, then add in heavy cream and cream cheese and heat until bubbling, but do not boil. Add in Parmesan Cheese and mix until the cheese melts. Sprinkle in salt and pepper to taste (you don;t need to use all of this, do to your liking). Mix the hot sauce into the noodles and serve. Top with fresh parsley and/or cooked chicken if desired.  Just like Olive Garden! Another quick and easy meal just in time for Back to School dinner blues.


Sunday, July 14, 2013

Creamy Potato Salad

My friend brought this potato salad to a BBQ recently, and it was the best potato salad I had ever tasted!  I LOVED it!  Of course, I begged for the recipe and used this same salad for our 4th of July festivities - it was a hit!
 
recipe image
She found the recipe on online at all recipes, but altered it a bit to suit her tastes.  I made it exactly like my friend did.  www.allrecipes.com says: "This is the creamiest, richest potato salad you will ever try. The secret is in the homemade dressing. I get nothing but raves every time I make this."

Ingredients:
  • 6 medium potatoes 
  • 1 bunch of green onions, finely chopped 
  • 1 teaspoon salt 
  • 6 hard-cooked eggs, diced 
  • 2 eggs, beaten 
  • 1/2 cup white sugar 
  • 1 teaspoon cornstarch 
  • salt to taste 
  • 1/2 cup vinegar 
  • 1 (5 ounce) can evaporated milk 
  • 1 teaspoon prepared yellow mustard 
  • 1/4 cup butter 
  • 1 cup mayonnaise 
  • 6-10 pieces of bacon, cooked and crumbled (optional, but a must in my house ;)
Directions:

1. Place the potatoes into a large pot, and fill with enough water to cover. Bring to a boil, and cook for about 20 minutes, or until easily pierced with a fork. Drain. Cool, peel and dice. Transfer to a large bowl, and toss with the onion, 1 teaspoon of salt, and hard-cooked eggs.

2. While the potatoes are cooking, whisk together 2 eggs, sugar, cornstarch, and salt in a saucepan. Stir in the vinegar, milk, and mustard. Cook over medium heat, stirring frequently, until thickened, about 10 minutes. Remove from heat, and stir in the butter. Refrigerate until cool, then stir in the mayonnaise.

3. Stir the dressing and the cooked and crumbled bacon into the bowl of potato salad gently until evenly coated. Chill several hours or OVERNIGHT before serving for best flavor.

Saturday, June 8, 2013

Chicken Roll-Ups

Another Pinterest recipe that we tried and enjoyed!

  • 2 (8 oz.) cans of Refrigerated Crescent Dinner Rolls 
  • 1 (10 3/4 oz.) can Cream of Chicken Soup, undiluted
  • 3/4 cup grated cheese
  • 1/2 cup milk
  • 4 oz. cream cheese (very soft)
  • 2 T. butter
  • 1/2 - 1 tsp. garlic powder 
  • 1 tsp minced onion flakes
  • 2 large cooked chicken breasts, finely chopped (or use about 2 cups)
  • 1/2 - 3/4 cup finely grated cheddar cheese
  • 1/2 tsp. seasoning salt
  • 1/2 tsp. ground black pepper
  • 2 T. milk
  • 1 - 2 c. grated cheddar cheese (for topping) 
Set oven to 350 degrees.  Spray a 9x13 dish with cooking spray. Mix together milk, 3/4 c. cheese and undiluted chicken soup (can season with black pepper if desired). 

For the filling - (make certain that the cream cheese and butter are very soft) in a bowl, mix the soft cream cheese with butter until very smooth, then add in garlic powder.  Add in the chopped chicken, onion and cheddar cheese; mix well until combined.  Add in 2 T. milk; mix to combine (add in a little more if the mixture seems too dry).  Season with season salt and pepper to taste.  Unroll the crescent rolls.  Place 1 heaping tablespoon chicken mixture (or a little more) on top of each crescent triangle, then roll up starting at the thicker end.

Drizzle a small amount of soup mixture on the bottom of the dish. Then place the crescent rolls seam-side down on top of the creamed mixture in the casserole.

Drizzle the remaining sauce on top (you don't have to use the full amount of cream sauce, just use as much as desired) and sprinkle with 1 cup (or more) grated cheese, or amount desired. Bake for about 30 minutes.
 

Puffy Baking Powder Biscuits

We tried this new recipe for baking powder biscuits, and loved how FLUFFY and BIG they turned out.  Easy to make and very delicious.  :)   

Ingredients:
  • 2 cups all-purpose flour 
  • 1 tablespoon baking powder 
  • 1 teaspoon salt 
  •  1 tablespoon white sugar 
  • 1/3 cup shortening
  • 1 cup milk 
Directions:
1. Preheat oven to 425 degrees F.

2. In a large bowl, whisk together the flour, baking powder, salt, and sugar. Cut in the shortening until the mixture resembles coarse meal. Gradually stir in milk until dough pulls away from the side of the bowl. (You may not need all the milk...)

3. Turn out onto a floured surface, and knead 15 times - but no more! Pat or roll dough out to 1 inch thick. Cut biscuits with a round cookie cutter or juice glass dipped in flour. Repeat until all dough is used. Brush off the excess flour, and place biscuits onto an ungreased baking sheet.

4. Bake for 10 to 15 minutes in the preheated oven, or until edges begin to brown.

We prefer to eat these smothered in honey butter.  :)

Homemade Chicken Strips

Looking for something to make out of ingredients on-hand the other night, and ran across this recipe from The Pioneer Woman.  Man, my kids loved these homemade chicken strips.  As Katelee calls them, they are mom's chicken nuggets.  I served these with these homemade biscuits and corn, and it was like KFC only tastier.  And definitely healthier.  :)

Ingredients
  • 1 package Chicken Breasts, Cut Into Strips (sometimes Called "tenders" Or "strips") (Or I just cut up chicken breasts myself)
  • Buttermilk (I used regular milk, and it worked perfectly fine.)
  • 1-½ cup Flour 
  • 2 teaspoons (to 3 Teaspoons) Lawry's Seasoning Salt (or Spices Of Your Choosing) 
  • Vegetable Oil 
Preparation Instructions

Start by rinsing and drying your chicken strips. (I skipped this step.) Next, in a bowl submerge the chicken strips in buttermilk for 15 to 20 minutes (or longer if you’d like). In another bowl combine about 1 ½ cups flour and 2 to 3 teaspoons of Lawry’s Seasoning Salt (or other seasonings if you prefer). Mix this together well. Next, add about ¼ to ½ cup of buttermilk into the flour mixture and stir lightly with a fork as you add it. Heat about 1 inch of vegetable oil in a large skillet over medium-low to medium heat.

Remove a few of the buttermilk-soaked strips and place them in the flour mixture, turning them over to coat them thoroughly. Place them on a plate. Continue coating chicken strips until they are all ready to cook. When the oil is sufficiently heated, begin cooking the strips a few at a time. Cook them for about a minute and a half or so on each side. When golden and crispy, remove them to a paper towel-lined plate. Serve with your favorite dipping sauce. Yum!

Oven Tacos

I found this recipe at Mommy? I'm Hungry, and we loved them.  Whether you do them in the oven or not (though I highly recommend you do!!)  this meat and bean mixture is yummy!


Text below found here.

Thought we'd give these oven tacos a try, something new. Actually the thought of having it half way assembled sounded pretty good, it's hard to fill a taco shell sometimes, especially little hands. This way the meat mixture and cheese is baked into the shell so spillage is eliminated. A bonus to these delicious tacos is the shell doesn't crack all over the place when eating either. I read in comments that some turned out soggy, but mine did not, I guess I let the meat mixture cook down a little more? The shells will be softer but not in a bad way. We loved them, the meat mixture was very good.

Oven Tacos
adapted from Blog Chef

2 lbs ground beef (or turkey/chicken)
1 small onion diced
1 small can diced green chilies
1 recipe for Homemade taco seasoning (below)
1 (8 ounce) can low sodium tomato sauce
1 (16 ounce) can fat free refried beans
2 cups shredded reduced fat Colby-jack cheese
18-20 hard taco shells {if gluten free, be sure they are}

Optional Condiments-
Lettuce (shredded)
Tomato (diced)
Salsa
Guacamole
Sour Cream
Olives, sliced 

Preheat the oven to 400 degrees. 

In a large skillet brown ground beef and onion over medium-high heat. Drain off any excess liquid. Return to pan, add chilies, refried beans, tomato sauce, and taco seasoning. Mix well and cook for a few minutes if mixture seems runny.

Spoon the taco meat mixture into the taco shells and place into a 9 x 13 inch baking dish (OR check out The Taco Rack), standing up. Sprinkle cheese over the top of the taco meat in each shell. Place into the oven and bake at 400 degrees for 10-12 minutes or until the cheese has melted and the tacos are heated through.
Remove from the oven and top with any optional condiments for serving.

Taco Seasoning
1 tablespoon chili powder
1/4 teaspoon garlic powder
1/4 teaspoon onion powder
1/4 teaspoon crushed red pepper flakes
1/4 teaspoon dried oregano
1/2 teaspoon paprika
1 1/2 teaspoons ground cumin
1 teaspoon sea salt
1 teaspoon black pepper

In a small bowl, mix all together. Store in an airtight container.
I used all of this on 2 lbs of ground meat with a little water mixed in.

Thursday, April 25, 2013

Candied Popcorn

We have made this recipe a few times over the past year.  It's great for a fun party treat or just something a little different.  The colors come out so bright and fun, and it's easy and really yummy!

Ingredients

12 cups popped popcorn
1 (14 oz.) can Eagle Brand® Sweetened Condensed Milk
1 (3 oz.) package cherry Jell-O (NOT sugar free!) or other flavored gelatin

Instructions

HEAT oven to 300ºF. Line large shallow roasting pan with heavy foil, extending foil over edges of pan. Butter foil.

REMOVE from oven and take out all unpopped kernels. Pour popcorn into prepared pan. Keep warm in oven.

COMBINE sweetened condensed milk and dry gelatin in medium saucepan. Heat and stir over low heat until mixture is slightly thickened and bubbly, 4 to 5 minutes. (For easy clean up soak in hot water immediately)

POUR mixture over popcorn. Stir gently to coat using a long-handled wooden spoon. Bake 20 minutes, stirring every 5 minutes. Carefully turn out onto large piece of lightly buttered foil. Cool. Break into pieces or clusters.

Please note that this recipe is from the Eagle Brand website.

French Bread

I tried this french bread recipe from the Our Best Bites cookbook last week and really loved how it turned out!  Note that you need several hours for this to raise, however.  I only noted the first raising time, and therefore started it too late.  I just let it rise in a (barely) warm oven with a pot of boiling water in there as well and it turned out in the end.

Ingredients:
  • 1 Tbsp. yeast
  • 1 1/2 c. warm water
  • 1 1/2 Tbsp. sugar
  • 1 tsp. salt
  • 4-5 1/2 c. flour
  • 3 Tbsp. vegetable oil
  • 1 egg, separated
  • 2 Tbsp. cold water
Instructions:
Combine yeast, water, and sugar in large mixing bowl and allow to stand 10 minutes or until bubbly. Add salt, vegetable oil, and egg yolk (set white aside for later) and combine. Add 3 c. flour and mix well until combined. Add enough remaining flour to make a soft dough that barely sticks to your finger. Knead, either by hand or in mixer (my personal and very lazy choice) for another 2-3 minutes.

Cover and allow to rise 1 hour 30 minutes.
Punch down dough. Spray a cookie sheet with non-stick cooking spray. Shape into loaf and place on greased cookie sheet.
Cover and allow to rise another 1 1/4 hours or until doubled. Keep an eye on things–if they seem like they’re getting so big that they might collapse, hurry and get them into the oven.
Preheat oven to 375. Mix egg white with water and brush over dough. Bake for 10 minutes and repeat brushing the dough with the egg wash.
Bake an additional 8-10 minutes or until bread is golden brown and your house smells like heaven.

Thursday, April 18, 2013

Homemade Graham Crackers

This is my last 'snack food' post for now, though I intend to experiment with making my own fruit roll-ups soon.  If you have a great recipe for that, or any other awesome homemade kid snacks, please let me know! 

In the meantime, I may have saved the very best for last, because these graham crackers are so scrumptious!  Some of these homemade snacks I will make again because I think they are healthier, some I make to save money, but these I will make again simple because they are so dang delicious!

My friend Sarah also shared this recipe with me, and it belongs to Smitten Kitchen.  I highly recommend you read her tutorial and view her lovely pictures, such as this one:
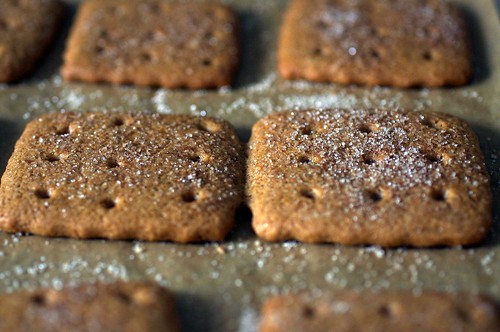


kissingcrust graham crackers

The following text is taken directly from Smitten Kitchen's website, unless you see it in red, in which case that is my personal thoughts and advice added in.  Enjoy!

Graham Crackers
Adapted from Nancy Silverton’s Pastries from the La Brea Bakery, and 101 Cookbooks, because for some absurd reason that will be immediately rectified, this book is not yet in my collection.

If you’re new to graham crackers, do know that the word “cracker” is misleading. They’re moderately sweet, like a cookie or biscuit, but they do have the snap of a cracker. I can’t say that I’d serve them with cheese, but if you’ve never schmeared them with cream cheese frosting, you’re missing out.

The topping amount will make a heavy coating, like the store-bought ones. Make only half if you just want a light-to-moderate sprinkling.

Makes 10 4 x 4.5-inch graham crackers or 48 2-inch squares

  • 2 1/2 cups plus 2 tablespoons (375 grams) unbleached all-purpose flour (a swap of 1/2 cup with whole wheat flour or 1 cup whole wheat pastry flour works well here, too)
  • 1 cup (176 grams) dark brown sugar, lightly packed
  • 1 teaspoon (6 grams) baking soda
  • 3/4 teaspoon kosher or coarse sea salt (4 grams)
  • 7 tablespoons (3 1/2 ounces or 100 grams) unsalted butter, cut into 1-inch cubes and frozen
  • 1/3 cup (114 grams) mild-flavored honey, such as clover
  • 5 tablespoons (77 grams) milk, full-fat is best
  • 2 tablespoons (27 grams) pure vanilla extract
Topping (optional)
  • 3 tablespoons (43 grams) granulated sugar
  • 1 teaspoon (5 grams) ground cinnamon
Make the dough: Combine the flour, brown sugar, baking soda, and salt in the bowl of a food processor fitted with the steel blade or in the bowl of an electric mixer fitted with the paddle attachment. Pulse or mix on low to incorporate. Add the butter and pulse on and off on and off, or mix on low, until the mixture is the consistency of a coarse meal.

[Alternately, if you don't have a food processor or electric mixer, you can cut the ingredients together with a pastry blender. Just make sure they're very well incorporated.]

In a small bowl, whisk together the honey, milk, and vanilla extract. Add to the flour mixture and pulse on and off a few times or mix on low until the dough barely comes together. It will be very soft and sticky. Lay out a large piece of plastic wrap and dust it lightly with flour, then turn the dough out onto it and pat it into a rectangle about 1-inch thick. Wrap it, then chill it until firm, about 2 hours or overnight. Meanwhile, prepare the topping, if using, by combining the sugar and cinnamon in a small bowl and setting aside.

Roll out the crackers: Divide the dough in half and return one half to the refrigerator. Sift an even layer of flour onto the work surface and roll the dough into a long rectangle about 1/8 inch thick. The dough will be sticky, so flour as necessary. Okay, she is not exaggerating here!  My dough was SUPER sticky, so sticky that it took me three tries to get it not to stick.  I even tried wax paper, but the dough is so soft that it stuck to the wax paper too!  My suggestion: put down LOTS of flour, spread evenly.  Roll once or twice, pick up dough, and reflour, and repeat until it's all rolled out.  Trim the edges of the rectangle to 4 inches wide. Working with the shorter side of the rectangle parallel to the work surface, cut the strip every 4 1/2 inches to make 4 crackers. [This makes a traditional graham cracker shape. I rebelled and made mine into 2-inch fluted squares with one of these.]  Personally, I just grabbed my pizza cutter and cut it into squares or small rectangles.  I even used the funky triangle shapes from the edges, because my family doesn't care and they taste the same no matter the shape.  :)
Place the crackers on one or two parchment-lined baking sheets and sprinkle with the topping. Chill until firm, about 30 to 45 minutes in the fridge or 15 to 20 minutes in the freezer. Repeat with the second batch of dough. Finally, gather any scraps together into a ball, chill until firm, and re-roll.
Adjust the oven rack to the upper and lower positions and preheat the oven to 350°F.

Decorate the crackers: Mark a vertical line down the middle of each cracker, being careful not to cut through the dough (again, this is for the traditional cracker shape). Using a toothpick or skewer (I like to use the blunt end of a wooden skewer for more dramatic dots), prick the dough to form two dotted rows about 1/2 inch for each side of the dividing line. I completely skipped this step, because I was ready to have these crackers done!  :)

Bake for 15 to 25 minutes at 350 degrees, until browned and slightly firm to the touch, rotating the sheets halfway through to ensure even baking. [The baking time range is long because the original recipe calls for 25 minutes but my new oven -- which I suspect runs crazy hot but have yet to confirm with the actual purchase of an oven thermometer -- had them done in way less. Be safe, check them sooner. Nobody likes a burnt cracker!]  So, I don't think my oven runs hot, and I baked my first batch on 350 for 15 minutes and they came out completely burnt!  Sad.  :(  Maybe I roll mine a lot thinner, I don't know, but I cooked the next batch on 325 for about 8 minutes and they were perfect.  So, I suggest you watch that first batch diligently until you know what works for you! 

Thursday, April 11, 2013

Easy Crockpot Applesauce

Continuing on with my homemade snacks theme is this ridiculously easy recipe for applesauce!  We LOVE applesauce around here.  As a result, even though I make and bottle applesauce for my pantry every fall, it's usually gone by January!  I've got to remember to triple the amount I make next time...

So, my awesome friend Kelly was feeding her kids homemade applesauce at the park the other day, and when I asked her about how she made it, she taught me that applesauce can be made easily in my crock pot!  What?!  Why had I never thought of this before?  Maybe this is something everyone else does already, but I tried it and it was wonderful.  Mmmmm....there is nothing as delicious as freshly made still-warm applesauce.  I have another batch going today that will be ready just in time for Katelee to get home from school, and it smells heavenly.  A perfect after school snack for a rainy day.


Photo from Comfy in the Kitchen


Want to make your own?

Ingredients:
  • 10 Apples peeled and sliced 
  • 1/2 cup water 
  • 1/2 cup sugar (optional - I do not personally ever add sugar!)
  • sprinkled cinnamon to taste
Put all in a crock pot for 4 hours on high. When it's done, it will be slightly chunky.  Personally, I like it this way, but you can use an emersion blender/ handheld mixer to make smooth.

My favorite apples for applesauce: Gala, Fuji, and Jonagold. Other apples that are good for applesauce: Red Delicious and Melrose.

Wednesday, April 10, 2013

Homemade Fishy Crackers

Okay, as promised, here is another DIY snack that you can make with your kids.  I was skeptical, but these really came out with that perfect cracker texture and my family and friends agree that these are actually BETTER than fishy crackers you buy.  Who knew you could make crackers like this?  And so easily? And with such wholesome ingredients?

This recipe is found over at Tasty Kitchen, complete with great pictures and instructions.

Ingredients:
  • 8 ounces, weight Sharp Cheddar Cheese, Shredded
  • 4 Tablespoons Butter, Cut Into Cubes
  • 1 cup Flour
  • ¾ teaspoons Salt
  • 2 Tablespoons Cold Water
 Directions:

Pulse everything (except water) together in the food processor until the dough resembles coarse sand.  Pulse in water, 1 tablespoon at a time.  Remove dough from the processor, wrap in plastic, and chill for 20 minutes.  Roll out the dough and cut into desired shapes. (The Tasty Kitchen link even has easy directions for making your own fishy cutter out of a pop can.  We just used my itty bitty fondant cutters for some fun cracker shapes.)  You can use a toothpick to make the eyes and smile if desired. Place on a parchment paper lined cookie sheet.  Bake at 350 degrees F for about 15 minutes, or until crispy. Makes approximately 7 dozen crackers.  Delicious!  Store in an air-tight container.

Here is a bowl of cheese crackers we made ourselves!

Monday, April 8, 2013

Homemade Granola Bars

Lately, serving my family homemade food without preservatives, extra salt, and who knows what else in it has become more and more important to me.  It started out at first as a way to save money.  I began making all our own bread, granola to replace cereal, cream of something soups, and so forth.  I was surprised at how rewarding it was to set a delicious meal in front of my family and know exactly  what was in it, and to know that it was made of wholesome ingredients that I could pronounce.  :)

I decided to take this a step further and try to begin making more of our snack foods.  I had been doing research on this for a few days when my amazing, talented friend Sarah posted on her blog all about the homemade snacks she had been making for her family!  Bingo!  She willingly shared her recipe sources, and they are perfect - exactly what I was looking for!

This week, I'll be sharing some of our new favorite snack recipes.  Today's amazing recipe: homemade granola bars!  Man, my kids eat these like they are candy bars.  :)  Literally, I give it to them for 'dessert' most of the time, but with no white sugar or corn syrup, and only a small amount of mini chocolate chips on top (optional) I feel great about serving them this dessert.

Not to mention the added advantage that making these granola bars costs pennies compared to the store bought prices.


 Photo from: http://mangiablog.com/2011/09/09/friday-link-love-back-to-school-recipes/


Ingredients:
  • 3/4 c. butter
  • 3/4 c. honey
  • 1 c. packed brown sugar
  • 6 c. quick cooking oats (not rolled oats!)
  • 3 c. crispy rice cereal
  • 1 1/2 tsp. vanilla
  • mini chocolate chips to sprinkle on top (optional)
In a large bowl, stir oats and rice cereal together.  Set aside.  In a small pot, melt butter, honey, and brown sugar together over medium high heat until it comes to a bubble.  Reduce the heat and cook 2 minutes.  Pour in vanilla and stir.  Pour over dry ingredients and mix well to moisten all ingredients.  Pour into a lightly greased sheet cake pan and press out to be about 3/4 inch in thickness.  You really want to press them down to they stick together.  Sprinkle with mini chocolate chips if desired and press down lightly.  Cool on a counter top to room temperature for two hours or until the chocolate chips are set before cutting into bars.  Cut into bars (I got 36 good-sized bars) and wrap in parchment paper or plastic wrap and store at room temperature.

*Notes:  I had no problem with the bars not staying together - they came out perfectly!  However, if your bars don't seem to be staying together when you cut them, you may have not boiled the mixture long enough . . . you want it to make it just past the softball stage.  Or you make them too thin or you didn't pack them in tight enough.  Stick them in the fridge for 20 minutes and that should help keep them together.  Be sure not to keep them in there too long or else they'll become super hard!  The next time you make them, try boiling for an extra 15 seconds or so.

*This recipe is a great base for a granola bar, and wonderful just as it, but you can use it to expand and add in whatever you want: coconut, butterscotch chips, nuts...

Adapted from a recipe from Rachael Ray.

Sunday, March 31, 2013

Perfect Lemonade

This was the perfect drink for our Easter meal today!


Ingredients
  • 1 cup sugar (can reduce to 3/4 cup) 
  • 1 cup water (for the simple syrup) 
  • 1 cup lemon juice (either squeezed from fresh lemons or straight from the bottle in your fridge!)
  • 3 to 4 cups cold water (to dilute) 
Make a simple syrup by heating the sugar and water in a small saucepan until the sugar is dissolved completely. While the sugar is dissolving, use a juicer to extract the juice from 4 to 6 lemons, enough for one cup of juice. (Or, if you are like me, and crave lemonade last minute and have no lemons on hand, just use a cup of bottled lemon juice - that works too!)  Add the juice and the sugar water to a pitcher. Add 3 to 4 cups of cold water, more or less to the desired strength. Refrigerate for 30 minutes, or if you simply can't wait that long, pour over cups of ice.  Enjoy!

P.S. We liked this just as is, but if it's too sweet for your taste, try adding a bit more straight lemon juice.

Awesome Dinner Rolls


Tonight we had a delicious Easter dinner, with these rolls being one of the major hits of the meal!  I wanted to make some to-die-for dinner rolls that didn't require rolling up into crescents (because those are the kind I usually make) and so tried this recipe from my Our Best Bites cookbook.  They were AWESOME and will definitely be made again.

World’s Best Dinner Rolls Recipe by Our Best Bites Ingredients
  • 2 c. whole milk (if you’re in a pinch, you can use 2%, but whole is best. Don’t use 1% or skim) 
  • ½ cup + 1 tablespoon sugar, divided 
  • 1/3 cup (5 1/3 tablespoons) butter 
  • 2 teaspoons kosher salt 
  • 2 packages active dry yeast (or 4 1/2 tsp.)
  • 2/3 cup warm (105-115-degree) water 
  • 8-9 cups all-purpose flour 
  • 3 beaten eggs 
Instructions: Combine milk, 1/2 c. sugar, butter, and salt in a medium saucepan. Heat over medium heat until butter melts. Remove from heat. Allow to cool until lukewarm. I usually rub some ice cubes along the sides of the pan or pop the entire pan in a sink full of ice cubes to cool the mixture down because this step can take forever. This step is really important because if the mixture is too hot, it will kill the yeast.

 While the milk mixture is cooling, dissolve the yeast and 1 tablespoon sugar in warm water. Let stand about 10 minutes. If the yeast hasn’t bubbled, you’ll need to repeat this step–moving on with yeast that hasn’t been activated properly will only end in heartache for you.

In a large mixing bowl, combine 3 c. flour and milk mixture. Beat on low for 30 seconds, scraping sides of bowl constantly. Add yeast mixture and beat on high for 3 minutes. Add beaten eggs.  Stir in as much remaining flour as needed to make a soft dough. This dough should be very soft–it will be coming away from the sides of the bowl, but it will still stick to your finger when you touch it. Don’t worry, it will firm up during the rising process. Part of what makes these rolls so good is that they’re so soft and light; if you add too much flour, they will be heavy and dense.

Place the bowl in a warm place and cover with a clean towel; allow to rise 1 hour. Punch down dough.

Lightly flour your work surface and turn dough out onto surface. Divide in half. Spray 2 9×13 glass pans with cooking spray. Roll first portion of dough into a rectangle and then cut it into 12 equal-sized pieces. I like to use a pizza cutter because it has a blade on each side, so it cuts right through dough without sticking to the blade. This dough should be very easy to work with, almost like playdough. Shape each piece into a ball and place in prepared pan. Repeat with remaining dough in the second pan.  

(Jennifer's note: personally I think flouring your countertop, rolling out the dough, cutting it, and then shaping it into rolls is a bit ridiculous.  I simply divided the dough in half.  You should get 12 rolls from each half.  So, working with half of the dough, I divided it into four equal parts, and took each of those parts and made 3 equal rolls out of each, resulting in 12 rolls.  Then repeat with the other half to get the second dozen.  I followed their instructions for the first pan of rolls and mine for the second pan of rolls, and there was no difference at all in the results, but my way seems a lot easier and less messy to me.  Though the dough was still sticky, so having flour nearby to use on my hands as I shaped the rolls was helpful.  :)

Cover with a clean cloth and allow to rise in a warm place for about 30 minutes. When dough has about 15-20 minutes to go (depending on your oven), preheat oven to 375. Bake for 15-18 minutes or until golden-brown. When done, remove from oven. Rub a stick of cold butter over the tops of the rolls. And enjoy the world's best dinner rolls!

Friday, March 22, 2013

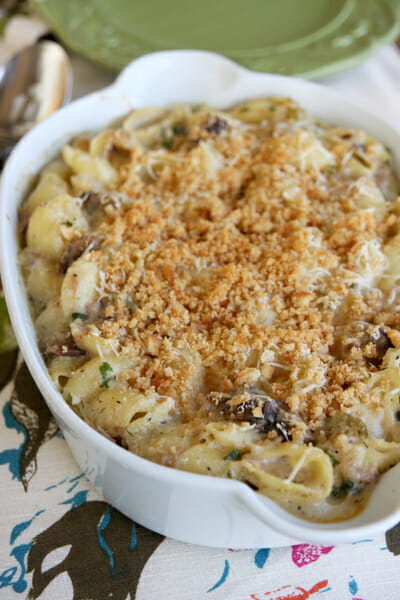
Dressed-up Tuna Casserole

I really like tuna casserole.

Is that weird to you?  Like the way I think Gerald's love of meatloaf is weird?

Anyway, I found a more dressed-up version of this creamy comfort food over at Our Best Bites, and I LOVE it.  My family ate it too!  Well, except Blake.  Who doesn't eat anything but mandarin oranges and Ritz crackers these days, it seems.  Boo.

Anyway, here is the fabulous recipe for anyone else who also enjoys a dinner of tuna noodle cheesiness for dinner now and then.  And if tuna is what turns you off here, you can substitute chicken.  


Tuna Noodle Casserole Recipe by Our Best Bites

Ingredients:
  • 8 ounces medium shell pasta, cooked al dente according to package directions 
  • 4 tablespoons butter, divided 
  • 1 medium stalk celery, thinly sliced or diced 
  • ¼ cup diced onion 
  • 8 ounces mushrooms, sliced or diced 
  • olive oil, as needed 
  • 4 tbs flour 
  • 1 14.5 ounce can chicken broth (just under 2 cups), warmed 
  • 1 cup milk, warmed 
  • ¼ teaspoon kosher salt 
  • 1/4 teaspoon black pepper 
  • ⅛ teaspoon dill 
  • 2 tsp fresh lemon juice, more if desired (I desired - I squeezed the whole lemon in) 
  • 2 tablespoons fresh minced parsley 
  • 1 cup freshly grated Parmesan cheese, divided 
  • 5 oz can tuna, packed in water, more if desired 
Topping:
  • 1/4 cup Ritz cracker crumbs mixed with about 
  • 1/2 tablespoon melted butter
 or
  • 1/4-1/2 cup broken up potato chips (I recommend kettle style) 
Instructions:

Melt 1 tablespoon butter in a large skillet. Add celery and saute for 2-3 minutes. Add onion and cook 2-3 minutes longer, stirring often. Add mushrooms and cook 3-5 more minutes, until mushrooms are golden and tender. If needed for moisture, add a drizzle of olive oil to the pan after the mushrooms are added; more if needed during remaining cooking time. Remove vegetables from pan and set aside.

Melt remaining 3 tablespoons butter in pan and add flour. Stir constantly for 30 seconds. Slowly add broth and milk, a little at a time while constantly whisking until mixture is smooth. Bring to a low simmer. Add salt, pepper, and dill. Stir constantly until thickened and bubbly, 2-3 minutes. Reduce heat to low and add lemon juice, parsley, and 1/2 cup Parmesan cheese. Whisk until smooth and taste. Season with additional salt and pepper to taste, and extra lemon juice if desired.

Remove from heat and add pasta, vegetables, and tuna. Stir to combine and place in a 3 quart baking dish. Sprinkle with remaining 1/2 cup cheese (feel free to add more if you want) and sprinkle cracker crumbs or chips on top. Bake at 350 for 25-30 minutes, until top is golden and pasta is hot and bubbly. Let rest 10-15 minutes before serving to allow sauce to thicken. Serves about 6

Sunday, March 17, 2013

Stuffed Pizza Rolls

Katelee and I made these for dinner tonight.  When we first started making them, we thought it was super fun!  We were having a great time.  By the time we finished pinching the last roll, however, we were whining about how much time this was taking and wishing we had just made pizza instead.  We threw them in the oven and 15 minutes later these golden brown rolls of deliciousness came out.  We really enjoyed dinner, and it was so fun to dip our pizza rolls.  The kids loved them.

My conclusion:  Will I make these again for just a busy night family dinner?  Probably not.  Yes, they are fun, but just making a pizza is so much easier.  HOWEVER, these make a fabulous appetizer.  Or finger food.  I picture using them for New Years Eve party or Super Bowl gathering.  They would be perfect for that!  And no, they really don't take that much time.  So if your kids really love dipping and you are a nicer mom than me, maybe family dinner is the perfect time to make these!  :)

I got the idea and photos from Our Best Bites, though I used all my own recipes instead of theirs. 


Start with a batch of pizza dough.  I made Melissa's pizza dough recipe.  OR, you could buy a tube of refrigerated pizza dough from the market.  Thin crust or regular crust works fine. 

Here is the recipe for the dough I used tonight:
  • 1 Tbl. honey (heaping)
  • 1 Tbl. oil (heaping)
  • 1 C. warm water
  • 1 Tbl. yeast
  • 1/2 tsp. garlic salt
  • 3 C. flour
Mix everything except flour then slowly add flour until all combined. Knead for a min.

Then, roll the dough out on a lightly floured countertop into a rectangular shape.  Mine was probably roughly 10 inches by 16 inches or so.  Using a pizza cutter, cut the dough into equal shaped squares, maybe a couple inches on each side.  Our Best Bites gets 24 rolls out of store bought dough.  Using the recipe above, I got about 35 pizza bites.

Now, you will need
  • mozzarella cheese
  • pizza toppings of your choice.  We tried pepperoni, ham and pineapple tonight - yum to them all!


Top each dough square with the toppings.  Just eyeball how much. You just need to be able to enclose the toppings in the dough so keep that in mind. When all of your dough squares have cheese and toppings on them, carefully lift up each square and wrap the dough around the toppings. Pinch to make sure each ball is sealed shut and then place them seam side down in a lightly sprayed pie pan (or similar sized dish). Brush the tops of the dough balls with olive oil or melted butter, and then sprinkle with
  • garlic powder 
  • Italian seasoning 
  • Parmesan cheese.
to taste.  Now they are ready to bake!

Cook them in a preheated 400 degree oven for about 15-20 minutes or until golden brown on top. Keep an eye on them! Doughs vary, so I’d check them after even 10 minutes.

Dip the hot, cheese rolls in your favorite pizza sauce.  I use this recipe here, and it was delicious!

  • 8 oz. tomato sauce
  • 6 oz. tomato paste
  • 2 tsp. Italian seasoning
  • 1 tsp. salt
  • 1/2 tsp. pepper
  • 1 tsp. onion salt
  • 1 tsp. garlic salt
Mix together and warm up in the microwave.


Serve these with a nice green salad and it makes a nice meal!

Thursday, March 14, 2013

Whole Wheat Buttermilk Pancakes

I am lucky enough to have an electric wheat grinder.  This means I can buy wheat (which is cheaper and stores forever!) and then grind it quickly and conveniently when I need wheat flour.  Freshly ground wheat tastes better and is more nutritious.  So, I grind my wheat fresh when I bake bread, rolls, whatever.  I highly recommend a wheat grinder.  :)  That is my little lecture for the day. Ahem.

Even if you don't have a wheat grinder, however, you should make these pancakes!

https://blogger.googleusercontent.com/img/b/R29vZ2xl/AVvXsEho3lct7-yhCTGaxZERqax_hehsQ9T7za3z_uVS1PX5jLTpDZyg4_RwKkPcmzCN5qHTv6VLgGbs99VBsinA-8F_OoVpyvIbLRCxpmarQCh2DBNY-nOrqgVTB0k7aUQZCIZMO6rinlBo0ym8/s400/pancake+close+up.jpg

I am trying to add even more whole wheat into our diets, and have started to make these Whole Wheat Buttermilk Pancakes from Our Best Bites.  We really really love them!  They are healthy and keep us full until lunch.  And the best part for me is that one batch of these serves us for two meals, so I can freeze the leftovers and pull them out for a great breakfast on a hectic morning.
  • 3/4 C whole wheat flour 
  • 3/4 C all-purpose flour 
  • 3 Tbs sugar 
  • 1 1/2 tsp baking powder 
  • 1 1/2 tsp baking soda 
  • 1/2 tsp salt 
  • 1 1/2 C low-fat buttermilk * 
  • 1 tsp vanilla extract 
  • 1 Tbs canola oil 
  • 1 large egg 
  • 1 large egg white 
  • Cooking Spray or butter for pan 
*As a substitute for 1 C buttermilk, place 1 Tbs lemon juice (or vinegar but I prefer lemon juice) in a 1 C measuring cup and then fill the remainder with milk. This recipe calls for 1 1/2 C buttermilk, so do the same thing with 1/2 Tbs lemon juice and remaining 1/2 C milk.  I do this with any recipe that calls for buttermilk, as it is not something I ever have in my fridge.

Combine flours, sugar, baking powder, baking soda, and salt in a mixing bowl and whisk together. In a separate bowl combine buttermilk, eggs, oil, and vanilla and whisk well. Add the wet ingredients into the dry and mix just until moistened and combined. Heat a nonstick griddle or skillet to medium heat. Make sure it's heated up before pouring the batter on.  Coat pan with non-stick spray or a little butter and then pour on pancake batter. Use about 1/4 C batter for large pancakes (5-6″) and 2 T for kid-sized ones (2 /2-3″).

Wait until bubbles form and edges are set and then flip. Makes 12 large or 24 small pancakes.


Freezer Instructions: These pancakes freeze wonderfully. Just lay out pancakes in a single layer on a baking sheet or other pan. Freeze until solid and then place in a zip-lock bag. To serve, just warm up in the microwave or toaster.

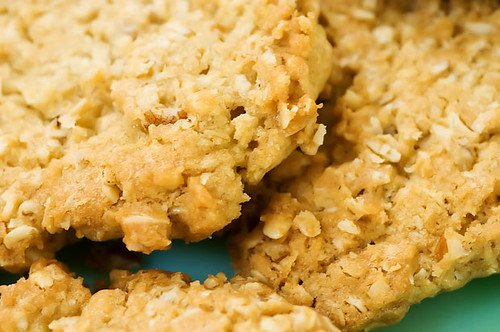
Oatmeal Crispies

I am always on the lookout for delicious, easy, interesting, different cookies.  I make cookies pretty often and get tired of the same old recipes all the time.  Today I tried Pioneer Woman's Oatmeal Crispies, and I. AM. IN. LOVE.  These are going right up there in the regular rotation of favorites!  Seriously, the Pioneer Woman has never failed me yet . . .


Ingredients
  • 1 cup Shortening (Crisco) 
  • 1 cup Packed Brown Sugar 
  • 1 cup Sugar 
  • 2 whole Eggs 
  • 1 teaspoon Vanilla 
  • 1-½ cup All-purpose Flour 
  • 1 teaspoon Salt 
  •  1 teaspoon Baking Soda 
  • 3 cups Quick Oats 
  •  ½ cups Finely Chopped Pecans 
Preparation Instructions

In a large mixing bowl, cream shortening with both sugars until well combined. In a separate bowl, beat eggs together. Add vanilla and stir to combine. Add to the shortening/sugar mixture and mix well. In a separate bowl combine the flour, salt and baking soda. Mix carefully into the egg/shortening mixture until well combined. Now add the quick oats and mix well again. Finally add the finely chopped pecans and mix well to combine.

Now the original instructions say this: Divide the dough in half and place each half of the dough onto a sheet of waxed paper. Roll the dough into a log and then wrap it tightly in the waxed paper. Now you can either chill or freeze the dough until later or you can go ahead and slice the dough evenly into cookie rounds. When you are ready to bake them place them on a cookie sheet and bake at 350 degrees for 10 minutes until they are golden brown.

Jennifer's changes: I divided the dough evenly into four parts, and rolled up each section into a log.  I got 12 cookies out of each roll.  I froze three of the logs so that I can pull them out, cut, and bake at a later time.  The fourth one I cut immediately into 12 equal parts, placed on a cookie sheet and baked for 10 minutes at 350 degrees.  I suggest you eat one warm, with milk.  Or two...  ;)

AWESOME!    

Friday, March 8, 2013

Homemade microwave popcorn

This is more an idea then a recipe but I wanted to share. This has become my new favorite way to make popcorn. It is super easy and makes the perfect size bowl of homemade popcorn.
What you need:
Brown paper lunch sack
1/3 cup popcorn kernels
Butter
Salt

Pour kernels into brown lunch sack fold the sack edges over twice lay fold side down in the microwave and cook for 2 minutes. Then pour into a bowl and butter and salt. There you have great popcorn that's much better then store bought and cheaper.

Sunday, February 24, 2013

Navajo Fry Bread

We enjoyed making Navajo Tacos for dinner recently.  I haven't made these in a long time, and I'm not sure why, because my family really loves them.  Here is a good recipe for making the fry bread.
  • 2 cups flour 
  • 1 TBSP baking powder  
  • 1 tsp. salt 
  • 3/4 - 1 cup hot water 
  • oil for frying
Combine flour, baking powder, and salt in mixing bowl. Add the water a little at a time to make a soft dough. Knead a few times then let rest. You can actually let this rest for up to an hour but we cooked them right away.

Pinch off balls of dough about the size of a golf ball. Roll out each ball on a floured surface with a rolling pin until dough is about 1/8 thick.
Heat about 2 inches of oil in a deep pan to about 375 degrees. Fry dough one piece at a time until golden. Turn to cook other side. Drain on paper towels. If done correctly the fry bread will puff up with several bubbles in the dough. Makes about 6-9 pieces of fry bread.

If serving for dinner: Pile them high with toppings to make Navajo tacos.  Our favorite way to eat these is with this beef recipe, beans, shredded lettuce, shredded cheese, sliced olives, diced tomatoes, sour cream, and salsa. Ground hamburger taco meat or chili is also a yummy idea!

For dessert or even a special breakfast you can slather these with honey and butter, and they are scrumptious.

Friday, February 22, 2013

Berry Buttercream Frosting

For years now, Gerald's favorite cake has been the 'triple berry' cake, as he calls it.  I've posted the cake recipe in the past - you can find it here.  The only difference is that when the recipe calls for frozen raspberries, I use a frozen mixed berry mix. 

But this year, I think I perfected the berry buttercream frosting.  Here is the recipe that I prefer to use with this cake, though there is also another recipe option you can find at the above link.

Berry Buttercream Frosting
  • 1 tsp. raspberry extract
  • 1/2 tsp. butter vanilla gel (optional.  You could substitute vanilla extract to taste.)
  • 2-4 T. water
  • 1 c. shortening
  • 1 T. Wilton Meringue Powder
  • 1 lb. powdered sugar
  • 1/2 c. frozen berries, thawed (I used a bag of mixed berries: blueberries, raspberries, boysenberries, and strawberries.  You could use any of these singly as well.)
Cream shortening and flavorings.  Gradually add powdered sugar and meringue powder.  Add berries and water until it is the right consistency for spreading.  Blend an additional minute or so, until creamy. Don’t overmix, or you’ll have too many air bubbles.

We served this cake and the peanut butter cake below.  If you ate a bite of both cakes together, it tasted just like a PB&J sandwich in cake form - ha ha ha! 

Peanut Butter Cake with PB Frosting

Gerald's birthday was last Sunday.  We invited some friends over for cake, and decided to make two cakes to ensure there was enough for everyone.  After choosing his usual favorite (triple berry cake), he jokingly said he wanted a peanut butter cake.  He didn't think I could really make a peanut butter cake, oh, he of little faith.  But I DID and it was AWESOME!  I'm not a huge peanut butter fan like Gerald is, but this was astonishingly delicious!  It is Gerald's new favorite cake.  I'm craving more right now...yum! If you have a peanut butter lover in your life, this cake will knock their socks off!

I found the recipe here.
  • 1/2 cup creamy peanut butter 
  • 1/2 cup butter, softened 
  • 4 eggs 
  • 1 (18.25 ounce) package yellow butter cake mix 
  • 2/3 cup water 
Preheat oven to 325 degrees F (165 degrees C). Grease and flour two 8 inch round cake pans. Combine 1/2 cup peanut butter and 1/2 cup butter or margarine. Cream until light and fluffy. Add eggs one at time, mixing well after each one. Add cake mix alternately with the water. Stir until just combined. Pour batter into prepared pans. Bake at 325 degrees F (165 degrees C) for 25 minutes or until cake tests done. Allow cakes to cool in pan for 10 minutes and then turn out onto a cooling rack to cool completely. Assemble and frost with Peanut Butter Frosting once cool.
  • 1 cup peanut butter 
  • 1/2 cup butter, softened 
  • 4 cups confectioners' sugar 
  • 1/3 - 1/2 cup heavy cream (or more)
  • Reeses' PB Cups (optional)
To Make Peanut Butter Frosting: Combine 1 cup peanut butter, and 1/2 cup butter or margarine.  Cream together until light and fluffy. Add the confectioner's sugar. Mix in enough cream to make the frosting of a spreading consistency. Apply to cool cake.  Sprinkle with crumbled PB cups or other PB candy if desired.

Thursday, February 21, 2013

Lemon or Orange Sugar Tea Cookies

recipe imageI was making cookies for some friends recently, and wanted to do something a little different than my usual standbys.  I went in search of a new cookie recipe, and ended up finding this one on allrecipes.com. 


I loved how these turned out.  These were just the right amount of crunchy and soft and had a very nice, light flavor!  My friends loved them as well.


Ingredients:
  • 3/4 cup butter 
  • 1 cup white sugar 
  • 1 egg 
  • 2 tablespoons corn syrup 
  • 1 teaspoon lemon extract (I didn't have lemon extract, so I substituted orange extract.  You could probably try any kind of extract here.  The orange was delicious.)
  • 2 cups all-purpose flour 
  • 1 teaspoon baking soda 
  • 1 teaspoon baking powder 
  • 1/2 cup white sugar 

Directions:
1. In a medium bowl, cream together butter and 1 cup sugar until light and fluffy. Beat in egg, corn syrup, and lemon extract. Stir in flour, baking soda, and baking powder. Cover dough, and chill in the refrigerator at least 1 hour.

2. Preheat oven to 325 degrees F (165 degrees C). Line a cookie sheet with parchment or wax paper. Roll chilled dough into walnut sized balls. Roll balls in remaining sugar, and place on the prepared cookie sheet.

3. Bake 12 minutes in the preheated oven, or until lightly browned.

Cream of "Something" Soup Recipe

I have so many recipes to post!  I'll try to catch up over the next few days.

First of all, though, I must share this recipe.  You have probably seen it on pinterest or blogs.  I've been meaning to try this out for months, and finally made some of this mix about a month ago.  This is why I think it is AWESOME!

1. It's cheap.  So, it's no secret that our family is on a tight budget.  In our 11 years of being married, I've never had to be so frugal with grocery shopping.  And cream of whatever soups are NOT cheap.  So, by making this mix, I am saving a significant amount of money over time.

2. It's healthier than the canned soup.  No preservatives, crazy amounts of salt, who knows what else...  just trustworthy ingredients you can probably find in your pantry.

3.  It's easy.  It took me five minutes to make up the mix and stick it in my pantry.  Then it takes me about five minutes to create the 'can of soup' for each recipe.  Easy peasy...

4.  It's DELICIOUS!  Surprisingly so!  I have now had the chance to use it in several completely different recipes.  One was a casserole that called for cream of chicken soup, another was a crock pot meal that called for cream of celery; I've used it in a sauce that wanted cream of mushroom... Every single one of these meals has turned out absolutely delicious!  I won't say that this recipe tastes exactly like a can of cream soup, but I am willing to bet that your family won't be able to tell the difference.  And honestly, I feel that the flavor was enhanced in my few experiences.

Are you convinced?  Here's the recipe:
  • 1 cup non-fat dried milk
  • 3/4 cup cornstarch
  • 1/4 cup bouillon powder (If you have cubes you have to smash them up. You can use whatever kind you like, such as chicken, beef, or veggie.  The only kind I had enough of was beef, so that is what I used.  Next time I plan to try chicken.)
  • 4 Tablespoons freeze dried minced onions (I didn't have any, so I used some onion salt instead)
  • 1 teaspoon dried basil
  • 1 teaspoon dried thyme (You could use dried parsley instead.)
  • 1 teaspoon pepper

Mix everything together well and store in an air tight container.  I keep mine in the pantry with the instructions below on it:

When you need a can of cream of soup, mix 1/3 cup dry mix with 1 1/4 cup water. Cook over medium or medium high heat, stirring, until thick.  It will look like the same consistency of the soup when it comes out of the can.

Voila!